CREATING A WATER FEATURE
WHY INSTALL A WATER FEATURE?
Water features are one of today’s hottest trends in landscaping. Environmentally friendly and completely customized, water features can be installed almost anywhere in your outdoor living area Bubbling rocks are very low maintenance yet provide many of the benefits that ponds bring. The sound of water, the appearance of the feature – the wow factor, especially the effects that night lighting produce. Moving water becomes a resource and sanctuary for wild life. Enhanced landscaping improves property value and water features provide soothing sights and sounds that help you relax and de-stress in today’s busy world. Energy efficient pumps and the use of timers make running the bubbler very cost efficient. We teach seminars on How To Build A Water Feature. These seminars go over the basic steps to simplify the process for you.
HOW TO START
IMPORTANT - the most important aspect to consider when building a water feature is – where will you get the most enjoyment out of it? Where will you be able to see it the most, and hear that wonderful calming sound? What kind of water feature are you trying to create? How much space do you have to work with? Do you already have a feature picked out or do you need to find one? Many decorative fountains are self-contained and require very minimal assembly. If you have chosen this type of feature, disregard the rest of this page and see our staff for precise details on your exact fountain. Do you have access to hydro where you would like to put your water feature, or can you get hydro to that spot easily?
Take the time to do some research. Look at different designs and styles and see which ones suits your taste, budget and purpose. Get your measurements! Write down your length, width, and height. Write down all measurements and be sure to include slopes and any differences in grade throughout the area you are planning to build on.
Sketch out a plan. It is important to get your ideas down on paper. This helps when communicating your ideas to others so that everyone is on the same page. Be sure to include your measurements and write down specific products that you know you’d like.
How much will you need? See our Formula & Calculator to figure out how much product you will need. If you need assistance figuring out how much is needed for your project feel free to come in or 519-765-2379 us anytime.
Getting your products: Will you be picking them up, or getting them delivered? Either way, it is important to come in or 519-765-2379 us ahead of time to ensure we have the products in stock and or a delivery spot available for you.
TOOLS YOU MAY NEED
![]()
paper & pen
![]()
tape measure
![]()
stakes & string
![]()
marking paint
![]()
square
![]()
level
![]()
shovel
![]()
wheelbarrow
![]()
rake
![]()
gloves
![]()
chisel
![]()
safety glasses
![]()
knee pads
![]()
rubber mallet
![]()
hose
PRODUCTS YOU MAY NEED
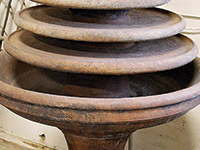
water feature
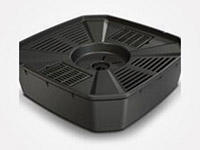
basin

tubing
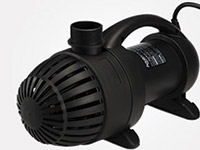
pump

clamps
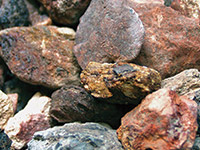
decorative gravel
night lighting
OPTIONAL ADDITIONAL MACHINERY
• Skidsteer • Stone Saw
*Make sure you are qualified to run any equipment you may rent, or have someone who is experienced with machinery come out and help.
INSTALLATION
1. PLAN
Go through the How to Start list, make a good plan, be sure to include your measurements, which type of product you need, and quantities.
2. PREPARATION
Pick our your water feature! Choose a piece that gives you the look and sound you would enjoy coming home to everyday.
Choose the basin size. This is determined based on the type of rock you have chosen, size, weight, and splash factor.
Ask the staff to help you pick out the appropriate sized pump and tubing you will need to give you the water flow you desire.
Light it up! Pick out some night lighting for your bubbler – this adds value and incredible beauty to your feature. Core lights are also available.
Choose the decorative stone to go around your feature.Decorative gravel, flagstone, pavers, your choice!
3. EXCAVATE
* If you are putting the basin on a deck, pre-existing structure (patio, pool deck or drive-way area), or are setting it on the ground and building up and around the basin, please disregard this step.
Mark out the area to be excavated.
*Remember to call the appropriate utility companies to find out where any lines may be buried before you dig! Phone, cable TV, internet, gas, hydro, waterlines, city piping…etc.
Excavate the area where you will be putting the basin. Excavate down 6-10” deeper than your basin’s depth. Have the very top of your basin be flush with the ground/grass.
*If a basin does not work for your project requirements, you can use liner and underlay in place of a basin. If you would like more information on this process give us a call and we can walk you through it.
4. BASE
Place Advanced Performance Bedding into the excavated area and level. Your gravel base should stop when the remaining depth of the hole will fit your basin flush with the outside ground.
If you are building your feature above ground be sure the area is as level and stable as possible.
5. BASIN PLACEMENT
Place the basin into the leveled hole. Backfill around the sides of the basin. Using a rubber mallet level the basin once you have completed backfilling.
6. ATTACHMENTS
Place the pump into the bottom of the basin. Attach the tubing to the pump and tighten with a clamp. Feed the tubing up through the center hole of the basin.
7. FEATURE ATTACHMENT
Place your feature onto the basin, while feeding the tubing up through your feature. Set your feature as close to the center of the basin as possible.
*If you have chosen a core light it is important to attach it before your tubing. Place the light into your feature and let the cord hang through the hole all the way out the bottom. Then place your tubing. The cord for your core light should run in between your feature and the tubing, not IN the tubing.
8. WATER FLOW
Fill the basin with water. Plug in the pump and adjust the height of the tubing in your rock to change water flow (push the tubing up higher for a bigger bubble, or pull it halfway down your feature for a smaller bubble). If the water flow is uneven, check the angle of the rock itself. You may have to move it around, or place small wedges underneath the rock to achieve desired angle and water flow.
9. FINISHING TOUCHES
Sweep the pavers clean and compact them with a plate compactor. Be sure to pass over your entire patio a minimum of three times in varying directions. This final tamping allows the pavers to settle into the Limestone Screenings. *Note: Certain speciality pavers require a pad on the plate compactor so as to not scratch or damage the paver.
ENJOY!
Sit back and enjoy your handy work!
PRINT INSTRUCTIONS
HOURS OF OPERATION
If there is bad weather, please give us a call to check if we are still open. Sometimes we close early due to inclement weather.
519-765-2379
APRIL
Monday – Saturday: 8am – 5pm
Sunday: Closed
MAY
Monday – Wednesday: 8am – 5pm
Thursday – Friday: 8am – 6pm
Saturday: 8am – 5pm
Sunday: Closed
JUNE
Monday – Saturday: 8am – 5pm
Sunday: Closed
JULY
Monday – Saturday: 8am – 5pm
Sunday: Closed
AUGUST
Monday – Friday: 8am – 5pm
Saturday: 8am – 3pm
Sunday: Closed
SEPTEMBER
Monday – Friday: 8am – 5pm
Saturday: 8am – 3pm
Sunday: Closed
OCTOBER
Monday – Saturday: 8am – 3pm
Sunday: Closed
*Appointments available after 3pm.
Call 519-765-2379 to schedule
NOVEMBER
Monday – Saturday: 8am – 3pm
Sunday: Closed
*Appointments available after 3pm.
Call 519-765-2379 to schedule
HOLIDAYS
CALL 519-765-2379
For updated 2023 Holiday Hours
CLOSE
CUBIC YARD
CALCULATOR
CLOSE