CREATING A POOL DECK
HOW TO START
What kind of pool deck are you trying to create? Will you be using natural or manufactured stone? Permeable pavers? How big would you like it to be? Are you putting a Rain Water Harvesting System underneath?
Take the time to do some research. Look at different designs and styles and see which ones suits your taste, budget and purpose. We have many design booklets available at Silverthorn Landscape Supplies to give you great ideas.
Get your measurements! Write down your length, width, and height. Would you like a border of a different style, if so, how wide? Write down all measurements and be sure to include slopes and any differences in grade throughout the area you are planning to build on.
Sketch out a plan. It is important to get your ideas down on paper. This helps when communicating your ideas to others so that everyone is on the same page. Be sure to include your measurements and write down specific products that you know you’d like.
How much will you need? See our Formula & Calculator to figure out how much product you will need. If you need assistance figuring out how much is needed for your project feel free to come in or 519-765-2379 us anytime. This is especially important if you are interesting in or planning to install a Rain Water Harvesting System, as there are many factors to consider, which will ultimately influence how much product you will need.
Getting your products: Will you be picking them up, or getting them delivered? Either way, it is important to come in or 519-765-2379 us ahead of time to ensure we have the products in stock and or a delivery spot available for you.
TOOLS YOU MAY NEED
![]()
paper & pen
![]()
tape measure
![]()
stakes & string
![]()
marking paint
![]()
square
![]()
level
![]()
shovel
![]()
wheelbarrow
![]()
rake
![]()
gloves
![]()
safety glasses
![]()
knee pads
![]()
rubber mallet
![]()
hose
![]()
hand tamper
![]()
broom
ADDITIONAL TOOLS
4' piece of 2" x 4" wood
2 pieces of ¾ - 1" pipes
for leveling purposes
PRODUCTS YOU MAY NEED
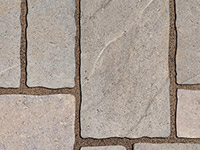
paving stones
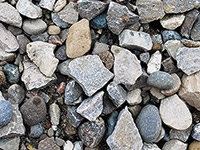
A-gravel
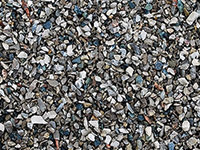
limestone screenings

paver restraints
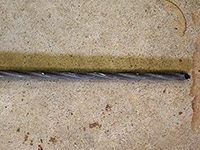
metal spikes
Gator Super Sand Bond - polymeric sand
*Note: There is a new product called Advanced Performance Bedding which can be used in place of A-gravel and Limestone Screenings. APB is specially designed to self-compact, while still allowing for proper drainage. Using APB eliminates the need to tamp your base every 2”. Instead, tamping occurs once the pavers have been laid. For more information on APB, or to learn more about when to use it versus A-gravel and Limestone Screenings, come in or give us a 519-765-2379.
OPTIONAL ADDITIONAL MACHINERY
• Skidsteer • Stone Saw • Vibrating Tamper / Plate
*Make sure you are qualified to run any equipment you may rent, or have someone who is experienced with machinery come out and help.
INSTALLATION
Note: If you are installing a Rain Water Harvesting System below your driveway, please see the Rain Water Harvesting System PLAN page. Then follow this installation guide for laying your pavers on top of your reservoir. If you are NOT installing a Rain Water Harvesting System, simply follow the guide below.
1. PLAN
Go through the How to Start list, make a good plan, be sure to include your measurements, which type of product you need, and quantities.
2. PREPARATION
Mark out the area to be excavated.
*Remember to call the appropriate utility companies to find out where any lines may be buried before you dig! Phone, cable TV, internet, gas, hydro, waterlines, city piping…etc.
3. EXCAVATE
Excavate the area a minimum of 6”- 12” deep (depending on your exact project type). Be sure to remove all loose soil. Your sides should be excavated a minimum of 6” wider than the area you are planning to lay pavers onto.
4. BASE
Place A-gravel into the excavated area, compacting every 2”. Grade the base as close to the final outline of your project as possible. Continue to add gravel and tamp every 2” until height requirements of your project are met. Be sure to slope all installations away from buildings (and the pool), for drainage purposes. (Minimum slope is one inch across every ten feet). Your gravel base should stop 3” (roughly) below desired finished height of the pool deck.
5. SCREENING
Once a solid A-gravel base has been compacted it is time for Limestone Screenings to be put down. Lay ¾”-1” diameter pipes on top of the compacted base so that when your pavers are laid they will be 3/8” above desired finished level, then put down Limestone Screenings. Level the screenings evenly by pulling the 2 x 4 board across the pipes. Once screenings are level, remove the pipes, and fill in the holes with additional screenings.
6. LAYING PAVERS
Lay your pavers directly on the bed of screenings you just leveled. Lay the border around the pools edge first, then start laying your pattern along the longest straight side of your pool – this minimizes the amount of cutting required. Use a string guide to keep the joint lines straight as you lay. Be sure not to lay the pavers too close together, or you will not be able to fix a line irregularity.
*(If you are doing any banding or accents, place these first before installing your main pattern. Build your main field towards your accent/boarder and cut the pavers to fit into the design).
7. CUTTING
Depending on the design you chose and the size of pool deck you are building, some pavers may need to be cut in order to fit the design properly. Mark your pavers and either cut them yourself * or bring them into Silverthorn and we will cut them for you.
*Be sure to wear the appropriate safety gear and have proper training on machinery when cutting any stone or paver. *See Cuttting under our Services for rates
8. EDGING
Once your pool deck has been laid it is important to install edge restraints to prevent your pavers from moving laterally. Using Snap edge and 10” metal spikes line the perimeter of your pool deck and hammer the spikes into the compacted base (do not hammer them into the soil as they will not hold).
9. COMPACTING
Sweep the pavers clean and compact them with a plate compactor. Be sure to pass over your en-tire pool deck a minimum of three times in varying directions. This final tamping allows the pavers to settle into the Limestone Screenings.
*Note: Certain speciality pavers require a pad on the plate compactor so as to not scratch or damage the paver.
10. FINISHING TOUCHES
To create a more durable pool deck prevent weeds and insects from getting into the joints, and resist erosion in steep slope applications, sweep Polymeric Sand in between the paver joints. Fill the sand so it is flush with your pavers. Compact again, and sweep more sand into the joints that have settled further. Whisk off each paver so it is free of any Polymeric Sand, and lightly mist your pool deck with a garden hose to seal the joints.free of any Polymeric Sand, and lightly mist your walkway with a garden hose to seal the joints.
*Note: some specialty pavers are not made to be used with polymeric sand
DONE!
There you have it! A beautiful pool deck!
PRINT INSTRUCTIONS
HOURS OF OPERATION
If there is bad weather, please give us a call to check if we are still open. Sometimes we close early due to inclement weather.
519-765-2379
APRIL
Monday – Saturday: 8am – 5pm
Sunday: Closed
MAY
Monday – Wednesday: 8am – 5pm
Thursday – Friday: 8am – 6pm
Saturday: 8am – 5pm
Sunday: Closed
JUNE
Monday – Saturday: 8am – 5pm
Sunday: Closed
JULY
Monday – Saturday: 8am – 5pm
Sunday: Closed
AUGUST
Monday – Friday: 8am – 5pm
Saturday: 8am – 3pm
Sunday: Closed
SEPTEMBER
Monday – Friday: 8am – 5pm
Saturday: 8am – 3pm
Sunday: Closed
OCTOBER
Monday – Saturday: 8am – 3pm
Sunday: Closed
*Appointments available after 3pm.
Call 519-765-2379 to schedule
NOVEMBER
Monday – Friday: 8am – 3pm
Saturday: 8am – 1pm
Sunday: Closed
*Appointments available after 3pm.
Call 519-765-2379 to schedule
HOLIDAYS
CALL 519-765-2379
For updated 2023 Holiday Hours
CLOSE
CUBIC YARD
CALCULATOR
CLOSE